

Fought on 15 December 1899, the Battle of Colenso was Buller’s first attempt to break through and relieve Ladysmith, which had been besieged by the invading Boers. As is well known, things went wrong almost from the start: on the British left, a combination of poor reconnaissance and poor maps led to the 5th (Irish) Brigade being unable to find the planned drift through the Tugela, and instead blundering into a loop in the river, while still in close order.
Over on the British right, however, an even greater cock-up was brewing, and that is where we shall focus our attention in this article.

Hildyard’s 2nd Infantry Brigade had been tasked with the central assault, advancing on the village of Colenso itself, and then crossing the Tugela via what was left of the two bridges there. But before they had moved off from their start lines, their supporting artillery – two batteries (the 14th and 66th Batteries)[1] of Lt. Colonel Hunt’s 1st Brigade Division,[2] and a battery of six Royal Navy 12-pdrs under Lt. Ogilvy RN[3] – had set off ahead.[4]
It is remarkable that Colonel Long[5] – who was meant to be in command of all of Buller’s artillery that day – had instead been ordered by Buller to take personal command of these batteries,[6] thus rather shunting Lt. Colonel Hunt to the side. Even allowing for any chance of inter-service rivalry, Hunt greatly outranked Ogilvy (a RN Lieutenant being equivalent to British army captain), so there was no obvious reason for Long to have been placed in direct command.

Colonel Long in RHA dress uniform – this is not what he wore in the battle!
The specific task assigned to the 1st Brigade Division in Buller’s orders was, ‘to proceed to a point from which it can prepare the crossing for the 2nd brigade’. Sir Redvers, at the conference of the previous afternoon, had thought it desirable to supplement this written order with verbal instructions as to the exact point at which the batteries should come into action. He had intended to convey to Colonel Long by these verbal instructions that the purposed preparation should be carried out at long range. But – for reasons which we shall probably never know – Long left the conference with the impression that Buller had meant medium range.[7]
This meant that, as he rode forward early that morning with Lt. Col Hunt and Lt. Ogilvy RN, at the head of the column of artillery, Long was looking for a suitable position somewhere around 2,000 – 2,500 yards from Fort Wylie[8] – which was the most southerly of the kopjes identified as the brigade division’s targets. Even despite the confusion between long and medium range, had Colonel Long deployed his guns at that distance from Fort Wyle, the whole course of events would have been different; despite the nonsense some people like to tell one another round the braai, the notion of the Boers picking off gunners with their Mausers at 2,000+ yards is utterly fanciful, whereas any republican guns which opened up on them would have been hammered and silenced by superior strength.[9]
In addition to the confusion over the correct range to come into action, the lack of coordination between Long’s batteries and Hildyard’s infantry became critical when the guns pushed on with only two companies of Royal Scots Fusiliers as an escort (these had been detached from Barton’s 6th Brigade, which had initially marched forwards with the guns, before diverging).[10] And even this paltry escort soon fell well behind the advancing column of guns as they were trotted forwards.[11]

RA gun team advancing
A tale of two dongas
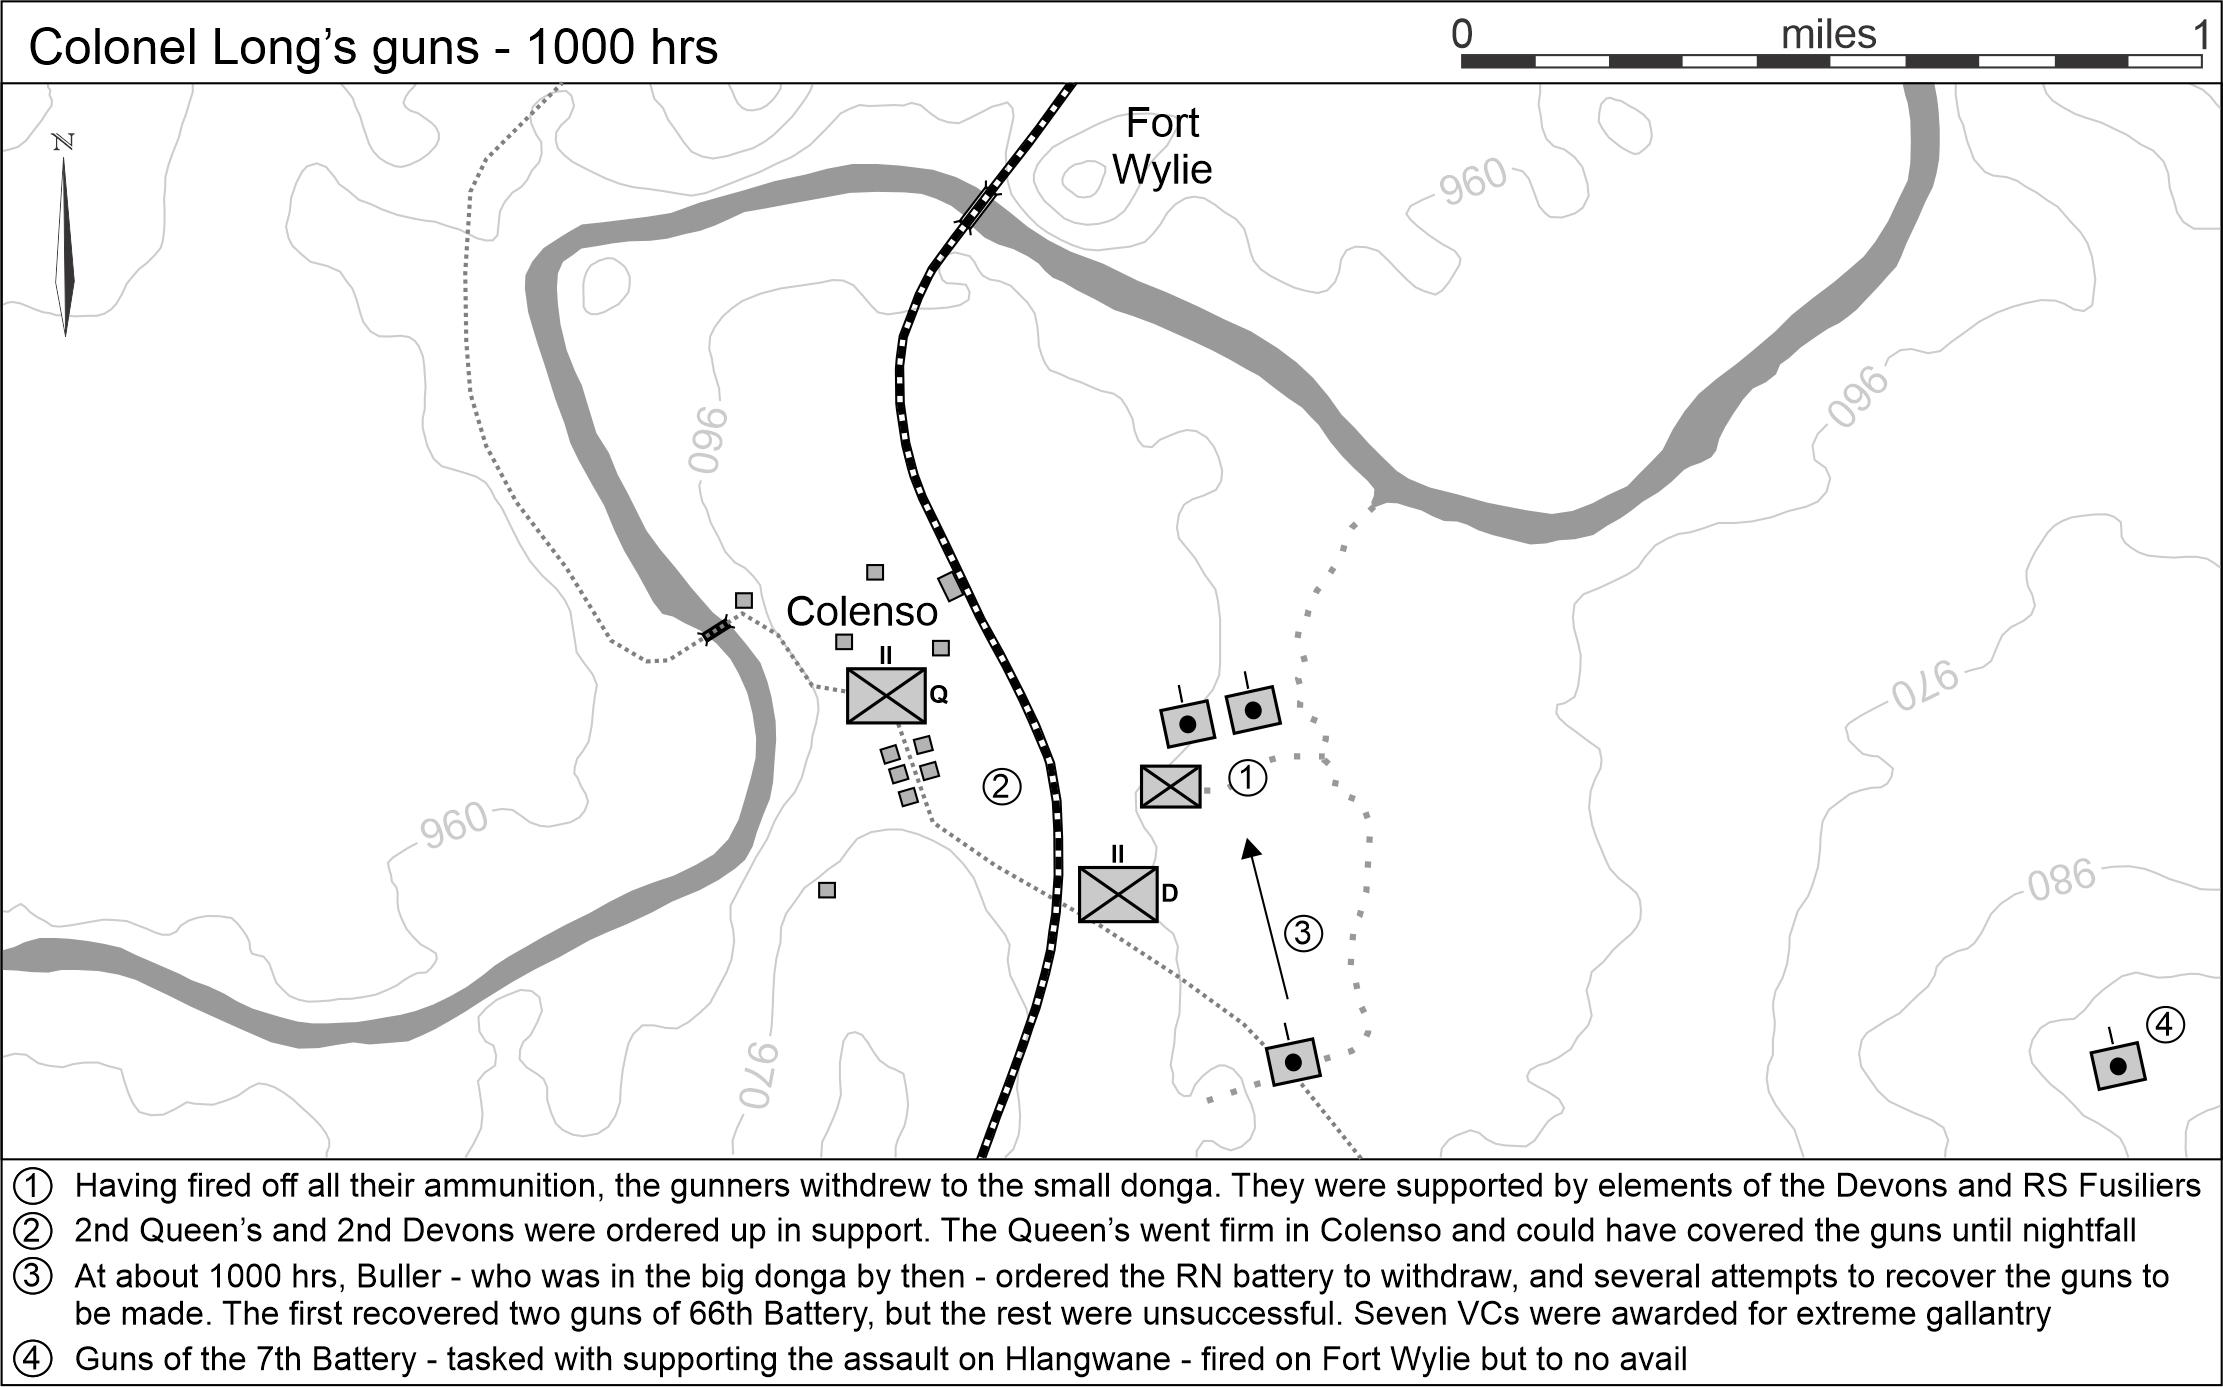
At about 0600 hrs, the two RA batteries were almost at the spot that Colonel Long had selected for them to deploy (the ox-drawn RN guns were still some distance behind). At this point, fate / ill-fortune intervened, and heavy firing was heard away to the left.[12] Though he had outstripped his infantry escort,[13] like the good gunner he was, Long was keen to provide immediate effective support, but was deceived by the light as to his actual distance from Fort Wylie. He thus ordered Hunt’s two batteries to push on, and come into action at a point about eighty yards to the north of a broad and shallow donga (which we shall refer to henceforth as the ‘small donga’) which ran at right angles to the railway and was to the front of his guns. Ogilvy’s Naval guns were to follow with the infantry escort and to unlimber on the left of the field batteries. The ground scouts of the brigade division had by this time reached the bush which lined the southern bank of the Tugela, and had confirmed that it was clear of the enemy.[14]
Trotting forwards towards the sound of battle, the two RA batteries approached the new, advanced, spot selected by Long, but cannot have been delighted when the range-takers reported they were now only about 1,200 yards from Fort Wylie.[15] By responding to the sounds of battle, the unplanned advance had taken the gunners to within the envelope of long range infantry fire.[16] The Boers, who had been ordered to hold their fire until Hildyard’s men were on the northern bank of the Tugela, were greatly spooked by the arrival of these guns, and – most probably by a lack of nerve – the ambush was sprung early. Even as Hunt’s guns were deploying in a perfect line, the gunners suddenly came under a storm of republican rifle, pom-pom, and artillery fire.[17] Despite the latter-day myths, no one can target a cap badge at over 1,000 yards, and the Boer rifle fire was not accurate – but the sheer intensity of fire was immense,[18] and would soon become telling.

Luckily, when Hunt’s batteries came under fire, Ogilvy’s slower-moving, ox-drawn, RN guns were still about 600 – 700 yards further back,[19] at the point where the track crossed a much deeper donga (henceforth: ‘the big donga’). Ogilvy’s leading section (ie. 2 guns) had just crossed the big donga, and he ordered them to deploy on the northern edge of it, and to start shelling Fort Wylie.[20] His rear section had not started crossing the donga at that point, and deployed on the southern edge, and also opened up. The central section was caught in the donga under pom-pom fire, which prompted the native drivers to flee in panic.[21] Nevertheless, and despite the confusion and havoc, these two guns were eventually also brought into action, also firing from the southern bank of the big donga.[22] That the RN guns deployed rather further back was entirely by luck, and it is remarkable that Long does not seem to have planned to deploy the RN guns any differently than the RA 15-pounders,[23] even though they boasted much greater range.

Guns taking on Fort Wylie
Further forward, things were quickly going wrong for the men of the 14th and 66th batteries. Colonel Long was very badly wounded,[24] and then Lt. Colonel Hunt was also hit. Nevertheless, and to no one’s great surprise, the gunners stuck to their task with phenomenal bravery and discipline. The first batch of ammunition wagons were emptied, and the second batch were brought forwards through the storm of lead with parade ground precision.[25] But just as the gunners were winning the firefight, and ‘Fort Wylie became a mass of bursting shell and red dust’, luck again conspired against Colonel Long. With each gun having fired between 80 and 100 rounds, even this second batch of ammunition was rapidly running out. Worse still, a requisition for replen from the ammunition column – some three miles to the rear[26] – was greatly delayed by the death of Captain A.H. Goldie, 14th Battery, and by the wounding of Captain F.A. Elton, 66th Battery.[27] The delay in bringing forward the reserve ammo could not have come at a worse time and Major Bailward – by then commanding the brigade division in place of the injured Lt. Col. Hunt[28] – requested (and was granted) permission to temporarily abandon the guns, and withdraw the gunners back to the small donga, some 80 yards to the rear. This was completed by about 0715 hrs. Once more ammo had been brought forward, the plan was to re-man the guns, and thus they had not been disabled.
The two escorting companies of the Royal Scots Fusiliers (A and B coys, under Captain D.H.A. Dick) had finally caught up,[29] and gone firm to the left of the batteries. But, with the guns now out of action, the musketry of some 200 troops could do little to suppress incoming fire from about 2,000 well-entrenched, and essentially invisible Boers[30] – even after Barton reinforced them with four companies of the Royal Irish Fusiliers[31] under Major C.R. Rogers.[32]
At this point, two battalions[33] of Hildyard’s 2nd Brigade belatedly advanced on Colenso village, coming on in open order,[34] with the now abandoned guns on their right.[35] Botha had intended to let the infantry cross the iron bridge before being fired on; cut off on the wrong side of the river under close-range fire from several sides, it would have been utter carnage, but, with Long’s guns springing the ambush early, the ill-disciplined Boers struggled to hold their fire as ordered[36] and instead opened up on the advancing Tommies at long range. This nervousness prevented the ambush from being anywhere near as effective as it could have been and, instead, Hildyard’s troops got into Colenso and dominated the Boers firing from Fort Wylie.[37] By this point, there was no thought Hildyard’s men forcing their way over the Tugela – indeed, Buller had ordered Hildyard not to proceed with the attack, but instead to send one of his battalions across the railway to support the guns, and the other to advance towards Colenso village, but without becoming too hotly engaged.[38]

2nd Queen’s (Royal West Surrey) advance and take Colenso
Had Hildyard launched his planned assault while Long’s guns were pummeling Fort Wylie, things might have been very different – three burghers of the Krugersdorp commando, who were manning the trenches near the river, stated subsequently that it would have been impossible for them to have maintained ‘any sort of fire’ on the infantry, if these had advanced while the guns of the 14th and 66th batteries were still in action.[39] But by the time Hildyard’s battalions were ordered forwards, the guns were already silent, and it was a case of too little, too late. As it was, there was little else they could do but hold their own in and around Colenso. Any attempt to cross the river was by then impossible.
Buller gives up
It was at this point – just a couple of hours into the battle – that Sir Redvers decided to call the whole thing off. Over on the left, the 5th Brigade was ordered to retreat and, again, the timidity of the Boers prevented it from being trapped and captured; Botha ordered Commandant Fourie to move and cut the Irishmen off in the loop, but Fourie’s men had no intention of leaving the safety of their trenches and remained serenely immobile. An outraged Botha later furiously declared that Fourie’s men had ‘continued to watch the battle, sitting manfully on the mountain’.[40] By 1000 hrs, and supported by fire from Lyttleton’s 4th Brigade, Hart’s brigade was clear of the loop.[41]
Instead of running the battle properly, and seeing the opportunities presented by the attempted storming of Hlangwane by Dundonald’s Mounted Brigade over the east,[42] Buller – a brave man but one who was unable to stand back and see the big picture – had been sucked into the middle of the action. Indeed, at that stage, he appears to have been entirely focused on Long’s two batteries of guns which had been abandoned by their crews. Remarkably, Buller left his command post, and rode to the ‘big donga’, where the RN guns were still in action.[43] To be fair to him, Buller appears to have been swayed by some false and alarmist reports he was given by an ‘Australian officer on Long’s staff’ who he encountered on his way there, and who stated that the batteries, including the Naval guns, were all out of action, their ammunition exhausted, and every officer and man of the gun detachments killed or wounded. To make matters worse, shortly thereafter, another of Long’s Staff, Captain Herbert, appears to have confirmed the previous report, though with the exception that he estimated that six rounds per gun were still left.[44]
Buller would direct much of the rest of the battle from the ‘big donga’[45] – a most inappropriate place to run a corps-sized action from: it was too close to matters for him to see the ‘big picture’, but too far removed from the ‘small donga’ for him to know what was really happening some 600 or 700 yards of bullet-swept plain to his front. Did he understand that the gun crews were sheltering therein, ready to re-man their 15-pounders as soon as ammo was brought forward?[46] Surely, when he arrived at the big donga and saw the RN guns were all still in action, with their crews barely scathed, Buller should have queried the alarming reports he had received en route.
And not only that, but even the big donga was far from being a safe place in which to establish a forward HQ; the ‘Donga of Death’ was appropriately named – Buller’s staff doctor was blown to pieces next to him, the horse of one of his ADC’s was shot through the neck, and those of several of his Natal Police escort were hit.[47] Sir Redvers himself was even hit by a spent shrapnel bullet while in the donga, but stoically waved away help, saying it had only taken his wind away.[48]
Buller showed a lot less in the way of stiff-upper-lip when it came to the guns, however, and his despondency was largely to blame for their eventual loss. As we know, the 15-pdrs had only been temporarily abandoned, due to there being no more ammunition, and the gunners, waiting defiantly in the small donga, had fully expected to return to them once more was brought forward. Instead, Buller stopped the movement of the ammunition wagons which were by then finally coming up, and ordered that the guns should be withdrawn – which, given that they were under heavy rifle fire, was surely no less dangerous than bringing ammunition forward to them, and getting them back in action.[49] Again, this suggests Buller had no idea that the gun crews were just behind the guns, sheltering in the small donga – which meant there had been a total breakdown in communication.
Even more remarkably, Buller first ordered the six RN 12-pdrs at the big donga to withdraw,[50] despite these providing covering fire, and being some 600 or 700 yards further back than the abandoned RA 15-pdrs. These were in no danger, and surely should have remained in situ to cover the attempts to withdraw the 15-pounders? As it was, the RN guns were all withdrawn safely,[51] though with so many of their oxen killed, an ammunition wagon had to be left behind by the bluejackets. This was, however, soon hauled to safety by a plucky Natal farmer named Pringle, who went out alone with a team of oxen, inspanned them under fire, and brought it back.[52] The loyalty and heroism of everyday Natalians was incredible – then again, they had every reason to want the Boer invaders driven out.
Attempts to recover the guns
The first attempt to recover the guns of the 14th and 66th Batteries was led by one of Buller’s ADCs, Captain Schofield.[53] Schofield – who would belatedly be awarded a VC for his endeavours – called for volunteers, and a handful of gunners stepped forward.[54] Buller then told some of the young officers on his staff to help too, and Captain Congreve,[55] of the Rifle Brigade, and Lieutenant the Hon. Freddy Roberts[56] – only son of Field Marshal Lord Roberts – joined the attempt. The party galloped forward with the limbers, coming under heavy fire from the get-go. Captain Congreve recalled, ‘I have never seen, even at a field firing, the bullets fly thicker’.[57] Congreve and Roberts were both hit before they made it to the guns, with Roberts being mortally wounded.[58] He was later awarded a VC for his gallantry – one of the first occasions when the medal was awarded posthumously. Captain Schofield and the gunners made it, however, and managed to hook in two of the 66th Battery guns, on the far right of the line.[59] They then galloped back under heavy fire, dragging these two to safety.

Three more attempts were made to save the rest of the 15-pdrs, men and horses plunging forward into the storm of lead, only to be scythed down. All were unsuccessful. Though he was no stranger to battle, the senseless slaughter of men and horses was too much for Buller, and he ordered that no further attempts would be made. Seven VCs would ultimately be awarded,[60] but – despite this impossible bravery – ten 15-pdrs were left standing in no-man’s land. A thoroughly disheartened Buller appears to have given them up as lost, and the battle to be over.
At around 1100 hrs, Buller ordered the Mounted Brigade to pull back from Hlangwane and, most remarkably of all, for Hildyard to withdraw his two battalions from Colenso.[61] The withdrawal of Hildyard’s men made little sense: his infantry had gone firm in the village, and – though they had no chance of getting over the river – were more than holding their own in the firefight against the Boers at Fort Wylie. As long as they remained in place, the guns – which were just to their right – were perfectly safe. Indeed, Lieutenant-Colonel Bullock, CO of the 2nd Devonshires,[62] even made his way to the small donga, and informed the gunners that his men would protect the 15-pdrs until nightfall. Similarly, Major Burrell of the 2nd Queen’s (Royal West Surreys), requested permission for his men to dig in until dark, after which the guns would be recovered.[63]
Colonel Long himself – whom Buller later told Captain Birdwood[64] he blamed for the defeat at Colenso[65] – also saw no reason for the guns to be given up, and one should also note that the Royal Artillery considered their guns in the same way as the infantry did their regimental colours – to lose them was an unthinkable disgrace. Long would later tell the Royal Commission into the war that, despite the causalities, he still had about four men per gun, and thus could have continued to work them as soon as ammunition was brought forward. He also stated that he was sure the guns could have been withdrawn after nightfall, had the escort stayed in position.[66]
Buller was having none of it, however, and to the intense embarrassment of the Royal Artillery, Hildyard’s infantry were ordered to withdraw, the battle was over, and the 10 guns were left on the field to be captured by the Boers. Buller’s decision to abandon the 15-pdrs was probably the most astonishing episode of the whole sorry affair: there was simply no reason why they could not have been kept under fire until night fall and then recovered.

One of the two guns of the 66th Battery which were recovered
But it was not just the loss of the guns that demonstrated Buller’s half-heartedness. The attack was never pressed with much enthusiasm, and Buller never fully deployed his reserves. Losses were comparatively light given the size of the imperial forces involved (143 men killed with several hundred more wounded and missing). As usual, Boer losses are uncertain, but thought to be in the region of 50, though one contemporary Boer account claims they were much higher: ‘115 killed, mostly by shellfire’.[67] If this latter figure was accurate, 14th and 66th Batteries must have had a lot to do with it.
Though Buller would blame Colonel Long for ruining his plans at Colenso, and claimed that he had been ‘sold by a damned gunner!’, it can be argued that Long had actually – though inadvertently – spared Buller a much heavier defeat. As we have seen, Botha’s plan had been to let the British infantry get across the Tugela, and then to have trapped and destroyed them on the northern bank. Botha later claimed that, by deploying his batteries where he did, Long forced the Boers to open fire sooner than planned, thus preventing the infantry crossing the river.[68] However embarrassing it might have been, the loss of the guns was far preferable to having one or two brigades destroyed.
So what went wrong, and why were the guns deployed within rifle range?
The first thing to bear in mind is that the British were operating with very unsatisfactory maps, and without the benefit of adequate reconnaissance.[69] Indeed, any attempt at pre-battle reconnaissance risked being shot to pieces by the Boers hidden on the far bank. For example, the famous / infamous dongas mentioned several times above are not distinct enough features to appear even upon modern maps with 10m contour lines, so were probably unknown to Colonel Long before they were encountered.
It has also been suggested to me by one knowledgeable expert,[70] that having chanced across the big donga, Colonel Long recognised it as a perfect place for his reserve ammunition wagons, limbers and other impedimenta, and then pressed on beyond this (as per regulations) to deploy his guns.[71] We know that Long changed his plans due to the heavy firing heard at 0600 hrs, but it is certainly possible that the big donga nevertheless featured in his thinking – though as per the manual, he could have deployed just 200 yards beyond it,[72] rather than about 600 or 700 yards in reality. This might sound like a trifling difference, but might have been significant: as we know, the RN guns were that distance further from Fort Wylie than the RA batteries, and only reported casualties of three men wounded in the action – one only very slightly. To be fair, the 15-pounders would have drawn most of the fire, and also that fire which was directed at the RN battery appears to have been mainly targeted at the oxen – 28 of which were killed or injured.[73] That said, the RN managed to withdraw their guns without difficulty.
One should also bear in mind that judging distances in the area is by no means easy – flat terrain and dead ground can trick the eye, and, though Long knew the Boer positions were on the high ground on the far bank of the Tugela, he had no idea exactly where. He later admitted in the post-war Royal Commission that he deployed further forward than he had intended.[74] What seems like a stupid blunder from the safety of an armchair today, is a lot more understandable when one bothers to walk the ground.
It is also easy to mock Long for being over-aggressive, and for not waiting for his infantry escort, but he actually followed the Royal Artillery Manual of Field Artillery Drill 1896 pretty much to the letter that morning. The manual prescribed decidedly aggressive tactics, including:
‘From the earliest possible moment, a number of guns superior to that of the enemy must be brought into action’
‘Guns must be near the head of the column. If moving forward without escort, artillery should ascertain that its front and flanks are clear of the enemy’
‘Guns should be deployed without waiting for the deployment of other arms’[75]
These were tactics which had been proved to be successful time and time again, and dash was strongly preferred over timidity. It is also worth bearing in mind the prescribed ranges for the deployment of batteries: Extreme or Long range was noted as greater than 2,500 yards, Medium range was between 2,500 and 1,500, and ‘Decisive’ range was noted as being less than 1,500 yards.[76] Thus, one could reasonably say that Colonel Long brought his guns forward according to the manual, and – though inadvertently – had deployed them on the cusp of Medium and Decisive range. Had he been more adequately supported by an advance by Hildyard’s brigade, and had the arrival of the reserve ammunition not been impacted, there is no reason to doubt that the gunners would have continued to hold their own.
That said, and though the British army tradition of thrusting aggression has won a lot more battles than it has lost, there was no reason why, when Colonel Long heard the heavy firing at about 0600 hrs, he could not have deployed his guns as planned, rather than trotting forwards to the advanced position which was adopted in reality. Had the 14th and 66th deployed as initially planned and opened fire from there, things might have been very different.
The Royal Artillery were past-masters at limbering and unlimbering their guns so as to move forwards under fire, and there was really no reason why, having tested the waters, as it were, Colonel Long could not then have pepper-potted his two batteries forwards another few hundred yards, one after the other. It is worth noting that at the British victory at Modder River,[77] fought just a couple of weeks earlier, RA batteries had initially come into action at 2,500 yards, then redeployed to 1,700 yards, then again to 1,200 yards. One especially boldly-handled battery had moved up to within 900 yards – though this was with infantry support.[78]
It is also worth noting that Buller should not have placed Colonel Long in direct command of the 1st Brigade Division batteries in the first place. There was no reason why Lt. Colonel Hunt could not have commanded his two batteries and the RN guns, while Colonel Long’s rightful place – as the commander RA – was at Buller’s HQ; from there, he would have been able to ensure that ammunition supply was prioritised for the two beleaguered batteries. There was certainly no way he could do that, lying injured in a donga. Equally, Buller – in addition to putting Long in direct command of the batteries – was also not acting in his correct role, and had no business being in the big donga, in the thick of the action.
As Major Darrell Hall put it:
‘Long’s place was with General Buller. There he could have exercised overall control of the artillery. He could have dealt with the ammunition problem. He certainly would not have been pinned down in a donga! It must be conceded that Colonel Long may have been a party to this mistake, as remember his aggressive character, he may have relished the thought of accompanying his gunners into action. Did he oppose General Buller’s order regarding his position in the battle? Probably not.
It is interesting to note that in the battle General Clery’s job[79] was done by General Buller, and Lieutenant-Colonel Hunt’s job by Colonel Long!’[80]
Was Colonel Long too close to the action, and – even before he was severely wounded – too caught up in events to see the bigger picture? If so, surely the same charge can be leveled at Buller. Why did he make his way to the big donga, rather than remaining at his HQ? By getting too close to events, and spending much of the morning under fire, Buller appears to have misunderstood the situation entirely, and not to have grasped that the gun crews were – if not perfectly comfortable – then at least hanging on in the small donga, only in need of ammunition.
When Buller ordered a retreat from the big donga and from the village of Colenso, incredibly, no order to retire appears to have been sent to the gunners and infantry support still hanging on up in the small donga, just behind the abandoned guns. On his own initiative, Lt. Col. Hamilton, commanding the 2nd Queen’s (Royal West Surrey) then holding Colenso, tried to get word to the men in the small donga: ‘I am ordered to retire; fear that you cannot get away’. This was sent in the direction of the small donga, addressed to ‘O.C.R.A., or any other officer’, but it did not reach an officer’s hands.[81] As we know, Colonel Long had been severely wounded, but surely someone else could have advised Buller to order the men sheltering in the small donga to retreat – or at least made him understand they were there.
With the troops withdrawing from the big donga, and Hildyard’s battalions ordered to pull back from Colenso, this inexplicable oversight led, not only to the gunners of the two batteries being left behind in the small donga, but also to Lt. Col. Bullock, who was there with two sections[82] of his 2nd Devons, and the remnants of the two companies of Royal Scots Fusiliers which had originally escorted the guns,[83] being abandoned. Most of these men were thus taken as POWs. 52 gunners from both batteries were taken prisoner, a number which included Lt. Colonel Hunt, OC 1st Brigade Division, and both battery commanders: Major Bailward of 14th Battery, and Major Foster of 66th Battery.[84]
What became of Long’s guns?
It is always stated that the Boers captured ten 15-pounders that day, but in reality, one (No.2 gun of 14th Battery) had been destroyed by direct hit from a Long Tom shell during the battle,[85] so there would not have been too much left of it. Captured without any ammunition (despite the lies of Louis Botha)[86] the other guns – not a type the Boers fielded – were of little practical use to the republicans, and appear to have been studied, used for training purposes, and then despatched in ones and two to the various fronts of their invasions.[87]
All of the 15-pdrs lost that day – like, indeed, all the other British guns lost during the war – were ultimately recaptured or recovered, though in various states of repair. Thus far, it has not been possible to track the movements of each and every gun taken that day, and – thanks to the paucity of record keeping by the Boers – it probably never will.
NOTES:
[1] The third battery of Hunt’s Brigade Division – the 7th – were tasked to support the efforts by Dundonald’s Mounted Brigade against Hlangwane
[2] Long’s 2nd Brigade Division – commanded by Lieutenant-Colonel Parsons – was only two batteries strong that day, and comprised the 64th and 73rd Batteries. The third battery of this brigade division had been lost at sea
[3] Maurice, History of the War in South Africa 1899‒1902, Vol.1, p.351
[4] Rethman, Friends and Enemies, p.171
[5] Colonel Charles James Long RHA (1849–1933), Commissioned into the Royal Artillery in 1870, Long served in the Second Afghan War of 1878–80 and then in the Sudan Campaign. He commanded the artillery at Omdurman, for which he was highly praised by Lord Kitchener and mentioned in dispatches.
[6] Maurice, History of the War in South Africa 1899‒1902, Vol.1, p.351
[7] Maurice, History of the War in South Africa 1899‒1902, Vol.1, p.358
[8] Hall, Halt! Action Front!, p.53
[9] Maurice, History of the War in South Africa 1899‒1902, Vol.1, p.359
[10] Maurice, History of the War in South Africa 1899‒1902, Vol.1, p.358
[11] Amery, The Times History of the War in South Africa, Vol.2. p.441
[12] Maurice, History of the War in South Africa 1899‒1902, Vol.1, p.359
[13] Amery, The Times History of the War in South Africa, Vol.2. p.441
[14] Hall, Halt! Action Front!, p.66
[15] Hall, Halt! Action Front!, p.72
[16] The Manual of Field Artillery Drill 1896 stated that Long Range infantry fire was out to 1,500 yards, whereas Decisive infantry fire was within 500 yards
[17] Maurice, History of the War in South Africa 1899‒1902, Vol.1, p.360
[18] Hall, Halt! Action Front!, p.78
[19] Interestingly, Major Hall states this distance as 800 yards – quite a discrepancy between his account, and that of both Maurice and Amery, who give the distance as 400 yards. From extensive map-work, I would say that Major Hall’s estimate is more accurate, and the distance was about 600 – 700 yards
[20] Hall, Halt! Action Front!, p.76
[21] Amery, The Times History of the War in South Africa, Vol.2. p.442
[22] Maurice, History of the War in South Africa 1899‒1902, Vol.1, p.360
[23] Maurice, History of the War in South Africa 1899‒1902, Vol.1, p.359
[24] Amery, The Times History of the War in South Africa, Vol.2. p.442
[25] Maurice, History of the War in South Africa 1899‒1902, Vol.1, p.361
[26] Amery, The Times History of the War in South Africa, Vol.2. p.442
[27] Maurice, History of the War in South Africa 1899‒1902, Vol.1, p.361
[28] Hall, Halt! Action Front!, p.81
[29] Amery, The Times History of the War in South Africa, Vol.2. p.443
[30] Griffith, Thank God We Kept the Flag Flying, p.183
[31] Hall, Halt! Action Front!, p.79
[32] Maurice, History of the War in South Africa 1899‒1902, Vol.1, p.360
[33] 2nd Queen’s (Royal West Surrey) and 2nd Devonshires
[34] Amery, The Times History of the War in South Africa, Vol.2. p.450
[35] Rethman, Friends and Enemies, p.171
[36] Bourquin & Torlage, The Battle of Colenso, p.24
[37] Knight, Colenso 1899, p.47
[38] Amery, The Times History of the War in South Africa, Vol.2. p.449
[39] Maurice, History of the War in South Africa 1899‒1902, Vol.1, p.361
[40] Bourquin & Torlage, The Battle of Colenso, p.19
[41] Knight, Colenso 1899, p.46
[42] https://www.chrisash.co.za/2025/12/15/on-this-day-in-1899-battle-of-colenso-but-how-could-buller-have-won/
[43] Maurice, History of the War in South Africa 1899‒1902, Vol.1, p.365
[44] Maurice, History of the War in South Africa 1899‒1902, Vol.1, p.362
[45] Knight, Colenso 1899, p.52
[46] It was claimed that it was not until the following day that Buller belatedly understood that the gun crews were sheltering in the small donga, awaiting ammo. See Maurice, Vol.1, p.362
[47] Wilson, With the Flag to Pretoria, Vol.1, p.99
[48] Griffith, Thank God We Kept the Flag Flying, p.189
[49] Hall, Halt! Action Front!, p.86
[50] Report of Lt. F.C.A. Ogilvy RN, quoted in Naval Brigades in South Africa, 1899-1900
[51] Report of Lt. F.C.A. Ogilvy RN, quoted in Naval Brigades in South Africa, 1899-1900
[52] Wilson, With the Flag to Pretoria, Vol.1, p.98
[53] Later, Lieutenant-Colonel Harry Norton Schofield VC, (1865–1931). Commissioned in to the Royal Field Artillery in 1884, he was attached to the staff of the Natal Field Force at the Battle of Colenso. Though he retired from the army in 1905, he rejoined and held various staff positions in the Great War.
[54] One of these, Corporal Nurse of the 66th Battery, would also be awarded a VC for his actions.
[55] Later, General Sir Walter Norris Congreve, VC, KCB, MVO, DL, KStJ (1862–1927). Born in Kent, Congreve was commissioned into the Militia, before graduating from Sandhurst and switching to the Rifle Brigade. He was promoted to captain in 1893. Once recovered from the wounds sustained at Colenso, Congreve served most of the rest of the war in the newly raised Kitchener’s Horse. In the Great War, he commanded brigades, divisions and then corps – including the XIII Corps at the Battle of Delville Wood. He was later appointed Governor of Malta, where he died. Remarkably, Congreve’s son, Major William La Touche Congreve, VC, DSO, MC would go on to win a VC in the Great War.
[56] Frederick Hugh Sherston Roberts VC (1872–1899). Born in India and educated at Eton and Sandhurst, Roberts was commissioned into the KRRC. Young Freddy seems to have been an incredibly brave and nonchalant fellow: Congreve remembered him setting off ‘laughing, talking and slapping his leg with his stick as though we were on the Mall at Peshawar again’. He died from his wounds two days later and is buried in what is now Chieveley Military Cemetery. Clery, Hildyard, and Dundonald all attended the funeral, though Buller did not.
[57] Hall, Halt! Action Front!, p.88
[58] Knight, Colenso 1899, p.53
[59] Hall, Halt! Action Front!, p.85
[60] https://www.chrisash.co.za/2024/12/24/the-seven-vcs-of-colenso/
[61] Hall, Halt! Action Front!, p.93
[62] When the order to retire came the Devons were so far forward that they did not all get the command timeously, and Colonel Bullock, 2 officers, and about half a company could not get back from the donga. Bullock, refusing to surrender, had to be knocked on the head by a Boer as the kindest and firmest method of bringing him to accept the odious facts. In his despatch of 17th December General Buller says: ‘Colonel Bullock, 2nd Devons, behaved with great gallantry. He did not receive the orders to retire, and his party defended themselves and the wounded of the two batteries till nightfall, inflicting considerable loss on the enemy, and it was only when surrounded that he consented to surrender, because the enemy said they would shoot the wounded if he did not’. Nice people.
[63] Hall, Halt! Action Front!, p.94
[64] Later, Field Marshal William Riddell Birdwood, 1st Baron Birdwood (1865 – 1951)
[65] Birdwood, Khaki and Gown, pp.95–96
[66] Hall, Halt! Action Front!, p.95
[67] Burleigh, The Natal campaign, p.125
[68] Knight, Colenso 1899, p.55
[69] Hall, Halt! Action Front!, p.66
[70] Dominic Hoole, ex-Royal Artillery, and a keen student of the Boer War
[71] The 1896 RA manual called for a distance of between 200 and 400 yards between the gun line and their support elements
[72] Hall, Halt! Action Front!, p.15
[73] Report of Lt. F.C.A. Ogilvy RN, quoted in Naval Brigades in South Africa, 1899-1900
[74] Hall, Halt! Action Front!, p.64
[75] Hall, Halt! Action Front!, p.63-64
[76] Hall, Halt! Action Front!, p.63
[77] Fought in today’s Northern Cape Province just to the south of the town of Rosmead (today, ‘Ritchie’)
[78] Hall, Halt! Action Front!, p.63
[79] Clery was nominally in command of the Natal Field Force, but Buller (who was the GOC for South Africa) had – for all intents and purposes – assumed direct command of the battle from the get go
[80] Hall, Halt! Action Front!, p.122
[81] Maurice, History of the War in South Africa 1899‒1902, Vol.1, p.366
[82] The reader should recall that, at that time, two sections made a half-company – so a section was about 25-30 men strong; closer in size to a modern-day platoon, than a modern-day section
[83] Maurice, History of the War in South Africa 1899‒1902, Vol.1, p.371-372
[84] Hall, Halt! Action Front!, p.109
[85] Hall, Halt! Action Front!, p.83
[86] Hall, Halt! Action Front!, p.80
[87] Hall, Halt! Action Front!, p.111

5 Comments
Great article Chris. Very noble of you to come to the defence of the Gunners!
I call them as I see them – despite what the increasingly lunatic rantings of the True Believers might have one believe!
Thanks for an excellent article Chris, especially when read with your equally excellent atlas close to hand. Some good footnotes too. I will check out Hall’s Action Front book. As the step- son of a former gunner, I like Ben, appreciate you coming to their defence. Ubique!
Thanks for the kind words and, whatever else went wrong that morning, no one could possibly doubt the courage or professionalism of the gun crews.
I was asked by one reader about the history of Fort Wylie, and I really should have mentioned this in the original article. ‘Fort’ Wylie was not a fort in the conventional meaning of the word, but was rather just a set of entrenchments and emplacements dug on a small hillock. These had originally been prepared by men of the Durban Light Infantry – at the start of the war, the regiment had mobilised to Colenso to defend the bridges there, and had dug several positions, one of which being ‘Fort’ Wylie.
As the Boer invaders continued to flood into Natal (in their – ahem – ‘defensive invasion’- if you are stupid enough to believe that myth), the Durban Light Infantry were later withdrawn down the line to Estcourt. After their attempt to push on to Durban was thwarted by the arrival of British reinforcements, the Boers pulled back and dug in along the Tugela, using the trenches at Fort Wylie as part of their line.
Add Comment